Introduction
Microsoft recommends using the Windows 10 in-place upgrade (IPU) method when you want to upgrade your Windows installation with a new feature update.
Using this method automatically preserves all data, settings, applications, and drivers – in theory!
Performing a Windows 10 in-place upgrade is unfortunately not always as easy as it should be.
Microsoft has included a command line option to run a compatibility scan that can be executed before running an upgrade.
Unfortunately, the compatibility scan does not always detect compatibility issues. Many issues are not encountered before the upgrade process is started.
Furthermore, the upgrade process behaves differently, depending on whether you run it using command line options or using the graphical user interface.
This causes many people to consider the upgrade process to be “unstable” when using the command line.
The Windows 10 IPU service provided by CapaSystems uses command line options to perform upgrades and is therefore also affected by the circumstances described above.
The purpose of this blog post is to describe the most common issues you can experience during an upgrade – and how to solve them.
This blog’s content is based on many hours of research and real-life experience gained by our highly skilled consultants.
Upgrade Issues
Top 3
External Devices
Many of the most frequent upgrade issues are caused by external devices that are attached to the computer during the upgrade process.
Especially Docking Stations, USB devices, and Thunderbolt devices are known to cause issues.
The optional prerequisite check rarely detects issues with external devices.
Hence, you will not experience the issue, before running the upgrade.
The symptom of issues caused by external devices is that the upgrade process starts, and then rolls back during the upgrade process.
The solution is to detach all external devices, before running the upgrade.
Hardware Drivers
Outdated hardware drivers are also known to be a common cause of issues.
The optional prerequisite check rarely detects issues with outdated hardware drivers.
Hence, you will not experience the issue, before running the upgrade.
The symptom of issues caused by outdated hardware drivers is that the upgrade process starts, and then rolls back during the upgrade process.
The solution is to update all hardware drivers, before running the upgrade.
We recommend using CapaDrivers to centralize and automate the update process for hardware drivers.
Security Software
Another common cause of issues is outdated or incompatible security software.
Especially outdated Antivirus software is known to cause issues.
The optional prerequisite check usually detects issues with security software.
The solution is to update your security software before running the upgrade.
Common Issues
Roaming Profiles
More than once, we have seen that roaming profiles have caused issues when running an upgrade.
The solution is to disable roaming profiles (temporarily) during the upgrade process.
Roaming profiles can be disabled using Group Policy Objects
User Profiles
Each local user profile takes 10-15 minutes to process during an upgrade.
Hence, if the computer has many user profiles, the upgrade can take more than 10 hours.
According to Microsoft, this is normal behavior
The solution is to delete obsolete and unneeded user profiles, before starting the upgrade.
System Partition Size
A less common cause of issues is the size of the System partition.
The System partition contains the files needed to boot the operating system, and should not be confused with the Windows partition.
If there is not enough disk space on the system partition, the upgrade cannot be completed.
The default size of the system partition has changed over time.
Windows 7 used a default size of 100 MB for the system partition.
Windows 10 uses a default size of 500 MB for the system partition.
Due to the above, issues with the system partition size are usually only encountered when Windows 7 has been upgraded to Windows 10 using the In-Place Upgrade process or when the default system partition size has been tampered with.
The solution is to reinstall the computer with the new version of Windows 10. We do not recommend changing the size of the system partition on an existing Windows installation.
Recommendations
Based on the various causes of issues described in the previous sections, we recommend doing the following before running a Windows 10 In-Place Upgrade.
Fortunately, CapaInstaller can be used to automate many of the tasks below.
- Unplug all external devices
- Upgrade all hardware drivers
- Upgrade security software
- Disable roaming profiles
- Delete obsolete user profiles
- Always use the newest media (ISO)
A more comprehensive list of “quick fixes” from Microsoft can be found at https://docs.microsoft.com/en-us/windows/deployment/upgrade/quick-fixes
Troubleshooting
Known Issues
Microsoft provides a list of known issues, for each feature update of Windows 10.
Log Files
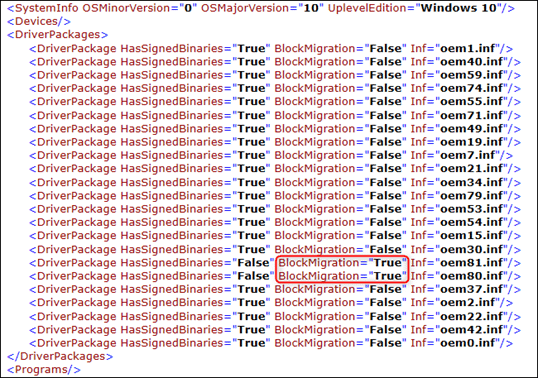
When a compatibility scan is executed, it creates the CompatData<timestamp>.xml file, which contains information about compatibility and migration issues.
In the example below, the drivers in oem80.inf and oem81.inf are not compatible with the new Windows feature update, and the upgrade process will fail.
Both the compatibility scan and the actual upgrade process create several interesting log files.
The location of the log files varies, depending on the update phase.
The SetupAct.log file contains all information about the actions performed during an upgrade.
The SetupErr.log file only contains information about the errors encountered during an upgrade.

You can read more about the logfiles and their location at https://docs.microsoft.com/en-us/windows/deployment/upgrade/log-files
Registry Backdrops
When the upgrade process encounters missing or corrupted components, it automatically tries to install or repair the components in question.
The upgrade process downloads the necessary source files from the on-premise Windows Server Update Services (WSUS) server if it is enabled in the environment. Unfortunately, the WSUS server does not always contain the necessary source files.
Allowing the upgrade process to contact Microsoft Update online and download the necessary source files directly from there sometimes fixes the issue of missing or corrupted components.
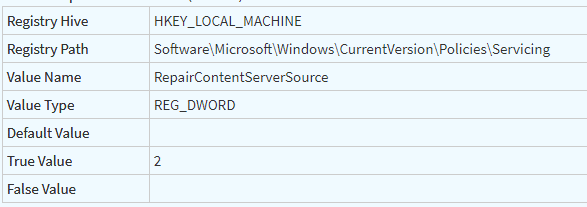
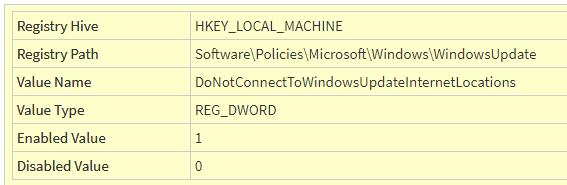
By changing the values below in the registry database, you can allow the Windows installation to download the source files directly from Microsoft Update online.
Tools
SetupDiag is a diagnostics tool, that can be used to gather information about why an upgrade has failed. It scans through the log files created during the upgrade process and passes only the important information to the SetupDiagResults.xml log file.
The log file from SetupDiag is often easier to read because it only contains important information.
Microsoft has integrated the diagnostics tool in Windows 10 2004 and newer. The tool is automatically executed when the upgrade process encounters an error.
You can read more about the tool at https://docs.microsoft.com/en-us/windows/deployment/upgrade/setupdiag
By Senior Consultant Dan Svendsen. Employed by CapaSystems since 2006. Dan is a competent and careful consultant with much focus on the client. He is detail-oriented in all he does. He is also the driving force behind CapaFactory.